You may wonder why you need cPHulk Brute Force Protection. The answer is simple, it provides a layer of protection against bad login attempts.
Your server is exposed to entire internet, enabling everyone to attempts login through different services including cPanel, FTP, WHM and email accounts. Brute force attack is an unauthorized attempt to access any of these services. This attack manifests itself through automation of login attempts with an extensive range of possibilities as the attacker hopes to get the right combination to get access through trials.
cPHulk Brute Force Protection is provided by cPanel and allows you to work at the Pluggable Authentication Module (PAM) level to identify failed login attempts from IP address. cPHulk protects your server by blocking IPs at the PAM level. cPHulk plays it safe, blacklisting the entire blocks of IP addresses (For example, a particular country). However, you don’t have to worry about how the users from this country will be able to gain an access to your website. They will be denied access only if they ever try out a login attempt to any of these cPanel core services.
It’s easy to enable cPHulk Brute Force Protection. The following step-wise guidelines will help you do that.
Step #1
As a root user, log into WHM

Step #2
Enter cphulk in ‘Find’ box which you will find at the top left. After then, .
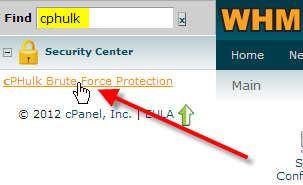
Step #3
Click on Enable, which is at the top, should you prefer default settings.
Step #4
You are allowed to make some
changes in the options of Configuration Settings to adjust how cPHulk will manage the blocking IPS.
Let us glance over some defaults to know what they actually do.

IP Based Brute Force Protection Period in minutes: How long cPHulk will frustrate the login attempts from a certain IP address in minutes.
Brute Force Protection Period in minutes: How long an IP address requires hitting its maximum failures in a minute to take step for blocking.
Maximum Failures by Account: There is no chance for an account to exceed the limit. As soon as max limit for allowed failures is reached, login attempts will be denied to the entire user.
Maximum Failures per IP: If the IP address hits this limit, it will be denied login attempts.
Maximum Failures Per IP before IP is blocked for two week period: If an IP addresses reaches this limit, it will be denied access for two weeks.
Send a notification upon successful root login when the IP is not white listed: By default, it is disabled and allows you to send email to yourself anytime.
Extend account lockout time upon additional
authentication failures: By default, it is enabled. If an IP address is
blocked and continues with login attempts, its lockout time will get extended
with every failed attempt.
Send notification when brute force user is detected: It is disabled by default and lets you send email to you anytime a brute force attempt is identified.